Nostr Basics and How to Use
I made a research so you don't need to.
Nostr (Notes and Other Stuff Transmitted by Relays) is decentralized protocol and social network, this means there is no company behind this social network.
To make this potokol work there are three main parts, relays, clients, and public keys. Relays are used to store data and messages we post on the social network. Clients are used to access information and messages that are stored on the relays, and also to post new messages. Private and public keys are used for user identification, you will have your own unique keys.
Everyone can run a relay, for this it is required to have some knowledge about running a server.
Like relay, everyone can create a client, for this you need to have some programming skills.
As the user of the client, you can change the client anytime if you don't like user interface of the current client or any other particular reason.
Using Nostr on the Computer
In order to access nostr via computer and web browser, we need to add an extension to the browser. For Brave and Chrome, it is nos2x. Of course, there are other options, but for now, we will use nos2x. Firefox users can choose nos2x-fox. After some experience, you can try other options.
Also, it is possible to create an account directly on web clients, but I found a browser extension more convenient because the private key will never be shared with a web client, it will stay on your device.
1. Install Extension
Brave and Chorme uses can go directly to https://chromewebstore.google.com/search/nos2x, click on nos2x and add extension.
Firefox users first need to open the extensions tab in the web browser and search for nos2x-fox, and then click on the option Add to Firefox.
2. Activate Extension
In the web browser's right corner, click on extensions, and then click on the newly installed nos2x extension.
Click on "start here", and you will see a page like the one in the image below.
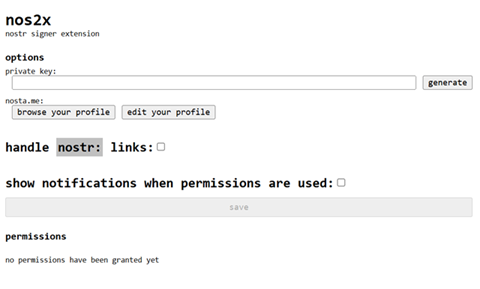
If you already have a private key enter the key in the "private key" field, and then click on the "save" button.
The private key starts with "nsec", while the public key starts with "npub".
In case you don't have a private key, click on the generate button, a new key will be generated, and click on "save".
If you generated a new key, please copy the key and store it in a safe place. This is the key to your account.
Now, we are ready to access nostr.
3. Access Nostr Using Web Client (website)
Go to https://primal.net. This will be your first web client.
Immediately, you will see a notification like in the picture below.
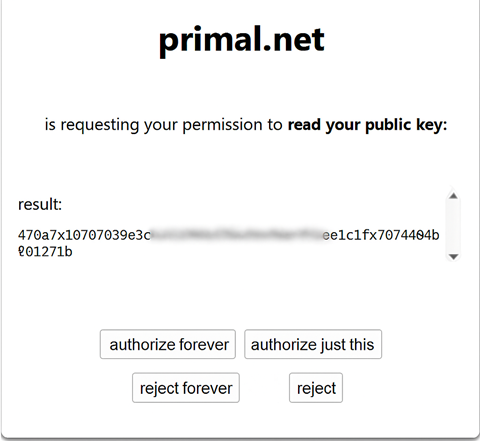
Four options are offered, authorize forever, authorize just this, reject forever, and reject.
Allow this event by clicking on authorize just this, you will have a couple of events you need to authorize.
Every new event, like posting new messages, liking the thread, or changing something, you need to confirm.
Of course, by clicking on authorize forever this specific event will be authorized forever, and you don't need to do it again; the event window will not be shown again in that case.
Except primal.net, my favorite picks are:
https://iris.to
https://yakihonne.com
https://coracle.social/notes
This is a benefit of using a browser extension, you can easily log in to different clients/websites.
Using on the Phone Android/iOS
On the phone, there are different options, we will go with the Primal application. Later you can change the application/client while keeping the account.
Download the Primal application and install it.
If you have a private key, choose the "Sign In" option, then enter the key, which starts with nsec, and confirm by tapping on "Sign In". That's it, you are logged in!
At the top of the screen will be choosen "Latest" option, change to "Trending 24h" to show some notes.
In case you don't have a private key, choose the "Create Account" option, and follow the steps written below.
1. Enter Display Name and About You
In about you option, you can type anything just to have an option to continue, tap on Next.
2. Your interests
Choose one or more interests, tap on Next.
3. Your Follows
The application will follow some people based on the interests you chose in the previous step, tap on Next.
Later you can follow more people or unfollow people that you are already following.
4. Account Preview
On this step, the account preview is shown, you can change the data anytime. Tap on "Create Account Now".
After this account is created, tap on "Continue".
5. Primal Wallet
Application will offer to activate the Primal wallet. You can activate this later if you want, tap on "I'll do this later".
That's it, you are logged in now!
Important! Remember to backup your private key, if you lose it you will not be able to access your account. Inside the application, go to settings, then tap on the option "Keys". Copy your private key, and don't share it with anyone. You can use it on other nostr applications. Private key is a string starting with "nsec".
If you want to follow me on Nostr, tap on the search option at the top of the screen and enter alek@vavok.net in order to find my profile.